What You Need To Do To Set Up a Professional Manicure?

A professional manicure is not something that one can just do with the help of a few tips and tricks- it takes time, patience, skills and materials. It is important to know what you are looking for before embarking on the process because there are tons of different types of manicures out there! If you’re all set, here’s what you need to do.

What Are the Features of a Professional Manicure?

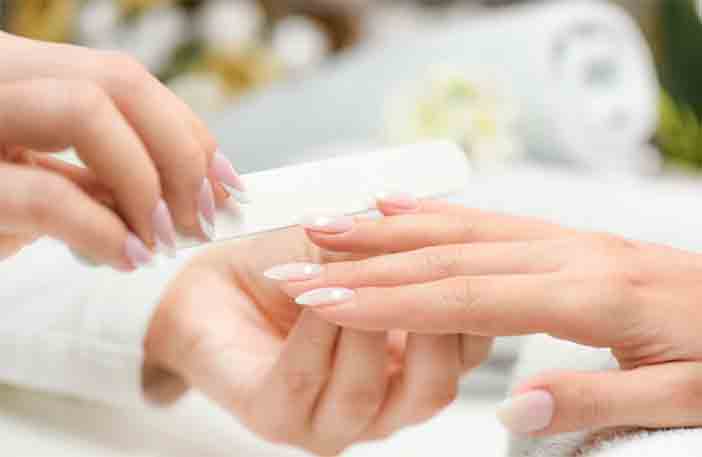
A professional manicure includes a number of things that range from the nails to the cuticles. For starters, you need to have clean hands and nails- scrub them well with soap and water or an alcohol-based hand sanitizer before you begin. You will also need access to nail polish remover, acetone free polish, cotton balls, q-tips and rubbing alcohol. Today’s O’CHIC provides more appealing looks through professional manicures.

It is important that your skin be moisturized as well as conditioned so use a hand lotion on your hands every day for at least thirty seconds in order to avoid cracking or peeling skin while doing this process. This will also help the polish stick around for longer, which is another plus of this step.

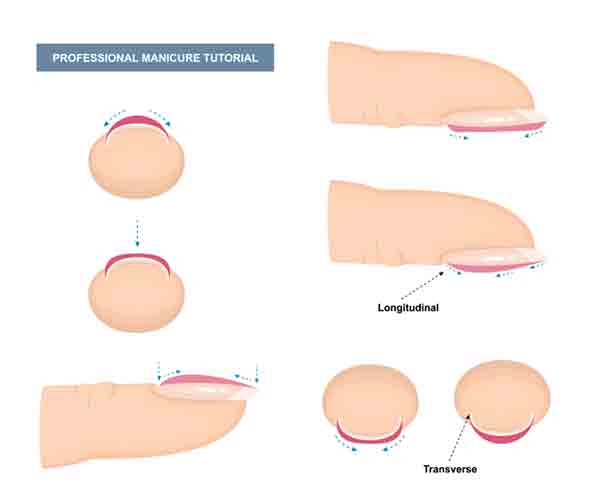
If you have long nails, it is important to cut them as well as shape them before applying any acrylic or gel on top of them. It is always best to cut your nails after cleaning them but before applying any polish. Sometimes gel nail kits come with a nail filer- if not, you can use an emery board or a 100-grit file. Doing this is very important as it helps prevent the paint from peeling off from the sides of your nails.

You can apply nail polish after cleaning and shaping your nails but take note that matte polishes are very thick and do not go on as easily as a regular polish would. It is important to wait about two minutes before applying the next coat in order for the first layer to dry. If you want a matte finish, make sure to use an oil-free top coat that has some shine to it but if you’re happy with the matte look, then just use a top coat that is not shiny.

How to Remove Old Polish?

Follow the same guidelines for removing old nail varnish as you would for other items of clothing, i.e., use a non-acetone remover and be gentle when removing glitter polishes.

What You Need to Know About Your Nails?

Your natural nails should be filed into gently curved square or oval shapes before applying any nail varnish. It is important to note that nails are more likely to be damaged if they are too long and pointed, so always keep them filed short. If you have varying ridges in your nails it’s best to apply a ridge-filling base coat beneath the color.

Summary

Congratulations, you have now completed a professional manicure! You are ready to be the envy of all your friends and colleagues with these gorgeous nails. With this guide in hand you will never need anyone else’s help again when it comes to getting that perfect manicure look. If for some reason there is something we missed or if anything doesn’t make sense please don’t hesitate to reach out so we can get back to you as soon as possible.

How to Clean and Maintain Your Airphysio Device

Airphysio devices are one of the most innovative pieces of equipment for improving your breathing. However, after a while, you need to know how to clean these machines. Airphysio is not like other home appliances it needs to be cleaned with specific cleaning agents and using certain techniques. If you don’t know how to clean your Airphysio, this article will teach you everything you need to know!

What is AirPhysio?

What is AirPhysio

AirPhysio is a device that improves the breathing of individuals with respiratory or pulmonary conditions. It can be fitted with masks, hoods and pillows to provide a more comfortable breath.

There are four main components of the AirPhysio: A compressor, A fan, A flow meter and valves. The compressor is what provides the airflow for patients to breathe, while the fan’s main function is to evenly distribute the air into particle form. The valve determines how much air is coming in from the compressor, and lastly, the flow meter measures how much air has been released from the device.

Why Should I Clean My AirPhysio?

Your AirPhysio device can be heavily contaminated. It has been found that people who use an AirPhysio device inhale three times as much bacteria, viruses, and mold as those who don’t. When you clean your Airphysio device professionally with a service company, you can avoid these problems. It is always good to have the right tools to avoid any damage.

How Often Should I Clean My Airphysio?

It is good to have your Airphysio cleaned every 4-6 months. If you are using it for respiratory therapy, more frequent cleaning will be required. Consult your service provider for specific recommendations.

How do I clean my AirPhysio?

First, you will need to make sure the AirPhysio is not plugged in before you do anything. Next, remove all the covers from your AirPhysio and wipe it down with a damp cloth that has a small amount of mild dish soap in it. The soap should be about 1 drop per 10mls of water in order to be effective. Then rinse the cover off thoroughly and let them air dry. It is important to clean your AirPhysio because airflow can become restricted if there is buildup on any of the components such as the fan blades or filters.

Maintaining Your Airphysio

As long as your machine stays clean, there isn’t any reason for scheduled maintenance apart from replacing parts such as the filters. If the machine breaks, then you will need to contact your company for warranty or repairs. You can prevent breakage by making sure that the machine is not knocked around and treated with care and respect! If you follow these simple instructions, your Airphysio device should last a long time!

Conclusion

Airphysio devices are innovative pieces of equipment for improving your breathing, but they need to be cleaned regularly.  Although it might be tempting to clean your Airphysio device as you would any other appliance, the manufacturers warn against using cleaning agents that contain alcohol or ammonia. When cleaning Airphysio, never submerge your device in water or use a steam cleaner on it. Read this article on how to clean and maintain your AirPhysio device!

How to Choose the Right Pair of Compression Socks

Compression socks are designed to improve blood circulation and reduce the risk of developing edema (swelling) in your legs. Compression socks are also helpful when recovering from a surgery or injury, as they help reduce soreness and swelling. These types of compression garments can be worn all day long for comfort, recovery, and prevention purposes. Choosing the right pair is important because you want to make sure that you have enough pressure on your leg but not too much so it starts to feel uncomfortable. This post will help you understand how to choose the right pair.

What to Look for in Compression Socks?

If you are considering choosing compression socks, it is important to make sure they are right for your needs. There are different features that you should be aware of, such as the type and level of compression, style (sock or knee-high), fabric type, and the amount of fabric around the foot. It is best to assess these features against your activities and needs so that you can be most comfortable.

The following article provides an overview of some of the features and benefits associated with well-known compression socks. The website also includes some links for more information about each feature.

As you can see, compression socks are available in a variety of styles. The sock style is generally best for people who want to wear their compression socks all day long and throughout different activities. It may not be as beneficial for those looking to use them during recovery after an injury or surgery just because it does not cover your entire lower leg. The knee-high compression socks are helpful for those who want to wear them while recovering from an injury or surgery, but would also like to wear them throughout their daily activities. They cover your entire lower leg and can be worn with different outfits so you can continue wearing them on a day to day basis. If you are looking for something that is easier and more comfortable to wear, you should go for the no-show compression socks. This type of compression sock is perfect if you are looking for a way to stay active while also feeling comfortable. They fit well within your footwear so they tend to be less visible than other types of compression socks. If you walk or work out a lot, or you are looking for an easy to put on solution, this type of compression sock is best.

Another important feature to consider when purchasing a pair of compression socks is the fabric they’re made from. The material should be soft against your skin while still remaining breathable and comfortable. This way, you will feel comfortable while wearing your compression socks even if you have to wear them for long periods of time. It is a good idea to keep in mind that some fabrics may also help reduce odor, which can be beneficial if you sweat often or participate in activities that cause your feet to sweat.

Conclusion Finally, you should consider the amount of fabric around the foot. Many compression socks come with an extra layer of fabric around the toes and the foot to add more comfort, but also provide additional support for your feet. This helps reduce discomfort while wearing your compression socks during your activities or recovery from surgery or an injury.

5 Reasons Why Everyone Should Use A 3D Pen

A 3D pen is a device that melts and cools plastic to create three dimensional objects. It can be used to imitate clay, ink drawing, and even metalwork. The only limit is the user’s imagination! Given its capabilities, a 3D pen can be a great asset for artists, hobbyists and inventors of all types.

1. It’s Easy To Use

A 3D pen is very simple and intuitive to use, so anyone can pick it up and start having fun with it right away. It works just like a regular pen or pencil, but instead of using ink, the device heats up plastic filaments and then pushes them through its tip which prints out the melted thermoplastic material in shapes that harden as they cool off. These objects can be used in any way desired; you can make solid basic shapes out of them by moving the 3D pen around until you form what you want and even create more complicated models with interlocking parts if you really put your mind to it!

2. It’s Not Expensive

A 3D pen typically costs less than $100 CND. This is not adapted to everyone’s budget, but compared to other art tools, it is very affordable. Furthermore, you can use the same pen over and over again for many years if you take care of it properly. That means that after making your first purchase, you will only have to spend money on the plastic filaments which are generally available at a low cost too. When you wish to find out details on 3D pen, you must click over here at pick3dprinter website.

3. High Quality Artwork

The possibilities with pens like these go beyond just creating simple objects; they really let people unleash their creativity! The best part about using them is that even basic shapes can be turned into amazing works of art through various painting techniques like shading or highlighting. Since you can control the shape of every line that is produced, you end up with a more detailed and polished final product.

4. It Encourage Creativity

Since pens like these are so easy to use, they provide artists with the perfect entry point into 3D art. A lot of people imagine drawing in three dimensions to be difficult or complex without realizing that it is actually possible through regular pens and paper by just using various techniques. However, most people don’t know how to do this yet and many others might feel discouraged if they tried because of how hard they thought it was going to be! This device makes it simple again for anyone with an interest in this field to learn about 3 art and thus gain access to another way of expressing themselves.

5. You Can Make Your Own Toys with Them

If you are an inventor or a creative thinker, this device might have just what you need to start making your dreams come true! For example, if you wanted to create a toy for your kids, but couldn’t find anything good enough that was available in the market, then just use a pen like this one to handcraft whatever object suits their needs! Having access to these kinds of tools makes it possible for anyone to take matters into their own hands and fashion whatever they desire through 3D printing technology.

Conclusion

3D pens are a great way to bring your creative ideas into reality. Whether it’s for fun or profit, these devices open up new possibilities that weren’t previously available with traditional methods like clay modeling or ink drawing. Ultimately, there is no limit on what you can create, so get started today!

Neon Sign Cleaning – Tips For Keeping Your Neon Signs in Good Condition

A neon sign is a type of illuminated signage that uses electricity to excite gases in the tubes, which create light. The color and brightness depend on the gas used. A neon sign is a great way to bring attention and traffic to your business. It’s important for your neon sign to remain clean so it looks like new! Here are a few tips from NeonDirect on how to properly clean neon signs.

What You Will Need to Clean a Neon Sign?

What You Will Need to Clean a Neon Sign

In order to clean a neon sign, you’re going to need a few supplies. You’ll need water and vinegar to kill the mildew that dirties your sign, soap and water to scrub away the gunk, and if possible, an air compressor or hair dryer to dry it off.

How to Clean a Neon Sign?

Cleaning your neon sign not only makes it look better, but it also helps to extend its life. First, mix water with vinegar in a spray bottle and begin to clean the neon sign. Be sure to spray off all of the dirt that has accumulated since it was last cleaned. If there is light mildew on the sign, spray it with your vinegar solution and use a sturdy brush to scrub clean. Before you apply soap and water to the sign, spray off any remaining dirt with your vinegar solution. Then use a clean part of the sponge to wipe away all soap residues. Make sure you dry the sign to stop any unwanted mold from forming. If you have an air compressor available, use it to suck out all of the moisture. If you do not have an air compressor, use a hair dryer to push the water out of the signs entire tubing and wire. You can do this by positioning the hair dryer on the opposite end of the sign you are drying. Keep in mind that your neon sign will still be slightly wet after cleaning. Any excess moisture can be eliminated by leaving the sign in a cool, well-ventilated area overnight.

Why It’s Important for Neon Signs To Be Cleaned Regularly?

The signs should be cleaned regularly to maintain their integrity and appearance. Cleaning is also important because dirt, dust, and pollution collect on the sign over time and begins to discolor it. The disks inside of a neon tube can only be lit for a few hours each day before they need to cool off. When these lights are on, they can become very hot and emit a dirty, yellowish light which further discolors the sign. Cleaning the sign with soap and water after dark will remove this lint from the tubes as well as any grime that has collected over time on the surface of the sign.

Conclusion

A clean neon sign is always better than a dirty one. It looks better, it attracts more attention, and it stays in good condition for much longer. Cleaning your neon sign doesn’t have to be complicated or expensive. Hopefully, by now you have a better understanding of how to clean a neon sign.

How does Smoking Affect Lung Capacity

Smoking is not only bad for your health in many ways, but it also decreases lung capacity. Each cigarette you smoke can damage your lungs to the point that they are unable to take oxygen into them or excrete carbon dioxide out of them. This makes it difficult for smokers to breathe and leaves their body without enough oxygen needed to function correctly. It’s best if you quit smoking now!

The Effects of Smoking on Lung Capacity

Smoking has been shown to have a number of negative effects on lung capacity, such as smoking restricting the function of your lungs. Smoking makes it harder for your body to absorb oxygen and expel carbon dioxide from your lungs. Smoking also decreases lung capacity and makes it difficult to do physical activities that require running or cycling. This can lead to a feeling of tiredness or even chronic sickness if you’re not able to breathe properly.

Some Effects of Smoking on the Lungs:

1. Smoking makes it harder for your body to absorb oxygen.

2. Smoking makes it more difficult for your lungs to expel carbon dioxide.

3. The earlier you start smoking, the more likely it is that you will experience decreased lung function later in life.

4. People who smoke are also less likely to participate in aerobic activities like running or biking because of their reduced lung function.

5. Every cigarette you smoke damages your lungs and decreases the amount of oxygen that can be absorbed by your body.

Health Risk Caused by Smoking

Smoking can be terrible for your health in many ways, but one of the more surprising ways it causes harm is to your lungs. With each cigarette you smoke, you are damaging your lung capacity to take oxygen in and excrete carbon dioxide out. This not only makes it harder for you to Atemtrainer, but also leaves your body without enough oxygen to function correctly. You may feel like you’re getting sick or having trouble breathing you may even feel chronically fatigued-because of the effects of smoking on your lungs!

The damage starts immediately and accumulates over time. The chemicals in tobacco smoke cause widespread inflammation all throughout your system, including the lungs. Inflammation is a good thing when it’s fighting off infection or injury, but smoking causes chronic, low-grade inflammation that never goes away. This constant irritation makes it easier for you to catch lung infections, and more difficult for you to get rid of them when you do. It also makes it harder for your body to fight off all the other stressors from smoking that can cause cells in your lungs or airways to mutate and become cancerous.

Every time a cigarette’s chemical compounds enter your system, they blast away protective cilia like shotgun blasts. Cilia are the tiny, hair-like structures that line your airways and help push mucus up and out of your body so you don’t get sick. When they’re damaged or destroyed, your lungs can no longer remove dirt, dust, and other harmful pollutants from the air before reaching the rest of your respiratory system and the rest of your body.

Conclusion

If you are a smoker, quitting now will reduce your risk factors for coronary disease, stroke, peripheral vascular disease, peptic ulcer disease, emphysema, and various cancers. The article has covered a lot of information about how smoking affects lung capacity. Hopefully, this information will assist you in quitting smoking for the rest of your life so you can live a healthy life!

How Do You Use the Infinity Cube Fidget?

The Infinity Cube fidget is a 3D symmetrical shape made up of smaller cubes that rotate within one another. This toy appeals to both adults and children because it is challenging but not too difficult, and can be used as therapy for people who find it hard to keep their mind from wandering or focusing on a single task.

This toy has been designed with the intention of being therapeutic, however many different people enjoy using this product because it offers challenge but isn’t too difficult.

What is Infinity Cube fidget?

It’s a toy. This toy is made for fidgeting, so while it can be used in many different ways there is no wrong way to use the Infinity Cube fidget. The shapes of the inner cubes are perfect for stacking and building with. They also fit perfectly into the center cube when nested together. Browse around this website for interesting facts about infinity cube fidget.

Here are some ideas for infinity cube fidgets:

Here are some ideas for infinity cube fidgets
  • Holding it in one hand and rotating both cubes at once so the inner cubes rotate as well.
  • Stacking more than one cube together, and then using your hands to rotate them simultaneously.
  • Employing various different strategies to use this toy and finding what works best for you!
  • Sitting and rolling the toy in your hands, making shapes out of the different combinations of cubes that are exposed.
  • If you have another cube, try stacking them on top of each other and rotating them both at the same time.

This Fidget Has a Number of Benefits:

Infinity Cube can be used as a fidget toy to help you focus and concentrate. Put the toy on your desk and focus on rotating the rows of cubies with one hand, while doing something else with the other, like typing. It’s also a great toy to help keep your mind occupied during lectures or meetings.

The Infinity Cube can also be used to learn about space in an interactive way. It is also good for people who are trying to get over an addiction, or who tend to experience negative thoughts when they are alone, by making it easier for them to focus on something else.

The Infinity Cube is not just a fidget toy; it can also be used as a stress relief product that helps you to de-stress and stay relaxed. While rotating the rows is a great way to improve focus, if you get frustrated or feel anxious, simply stop using it for a while and start again later when you are feeling calmer.

It can also help to improve your memory and problem solving skills. The symmetry of the cube makes it easy for you to see things from different angles and positions, which is great for your brain.

The Infinity Cube is a fun and interesting way to keep your mind occupied while improving the health of your brain. It’s also a fantastic product for people with autism or ADHD who struggle to keep their mind on one task.

Conclusion

Once you’ve figured out your preferred way to use the toy, it is important to keep in mind that it should be a tool for stress relief and not one that will cause even more stress. You want to make sure that you’re doing something with this toy to help yourself feel better, such as pairing fidgeting with breathing exercises or something relaxing from the other suggestions in this article. We hope you enjoy your stress relieving Infinity Cube fidget!

How To Install A Tow Hitch On Your Vehicle?

Towing is a great way to get your car out of the mud, or even just make it easier to move in the summer. But if you don’t have a hitch, you need one! And that’s no easy task because there are so many different types and styles. What should be simple can actually be quite complicated. Therefore, this informative article will assist you in determining the best method to install it on your vehicle with ease.

What Is A Tow Hitch And Why Do You Need One?

A tow hitch is a device that attaches to the front of an automobile which allows it to be towed by another vehicle. It’s attached to the frame of the car and has a tow ball or eye splice that stays in place by using pins. This ball or eye is where you attach your trailer, boat, etc. A tow hitch is necessary if you’re going to be moving your vehicle with another one.

The benefit of a tow hitch is that you don’t need any extra equipment like ramps and this costs less than having someone come out and tow it for you.  

Which Hitch Is Right For You?

There are many different types of tow hitches for vehicles, but the ones that are most commonly used are the “hitch ball mount” and the “fifth wheel”. Your choice will depend on what type of car you have. A hitch ball mount is typically used for smaller vehicles, while a fifth wheel will be better suited for trucks and SUV’s.

If you’re not sure which to get, then let your vehicle be the guide! The hitch that attaches to your frame at the back of your car is a fifth wheel, while one in front of it is a hitch ball mount. Your choice will depend on where you store your spare tire and how much clearance there is between it and the ground.

How To Install A Hitch On A Vehicle?

To install a hitch on your vehicle, you can follow these five easy steps:

1. Locate an area that is flat and has clearance for the hitch ball mount or fifth wheel.

2. Inspect the tow hitch for any defects. Clean the area where it will be mounted if it’s dirty. If there are any bent, damaged, or missing pins, they will need to be replaced with new ones before installation.

3. Mount the hitch to the vehicle frame by tightening bolts in a criss-cross pattern using a torque wrench. You’ll want to tighten them tight enough to feel resistance but not so much that it bends your frame from too much pressure.

4. Attach your trailer ball or fifth wheel to the hitch. You’ll then want to tighten its mounting bolts in a criss-cross pattern using your torque wrench.

5. Test the hitch to make sure it’s secure and there is no shifting or movement when tested by pulling at the ball or fifth wheel with slight pressure. Congratulations, your vehicle is now tow ready!

Conclusion

Towing is a necessity for many drivers, whether you need to move your car or tow a trailer. Installing the right hitch on your vehicle will make it easier and less stressful towing in any situation. With these 5 simple steps, installing a hitch ball mount can be done with ease by anyone who would like one!

Choosing The Right Golf Blades For Your Game

Golf is a popular sport that requires the use of specialized equipment to get the most out of it. One such piece of equipment is golf blades, which come in various types and are important for playing well. Now have a look few important speeches about golf blades:

1. What Are Golf Blades?

What Are Golf Blades

Golf blades are the part that actually touches the ball when golfing. Golf blades come in two varieties: steel or graphite. Graphite is a lot softer and weigh less than steel, whereas steel is stiffer but still has a heavier weight than graphite. The type of game being played can determine which blade to use.

2. How Golf Blades Work?

Golfers use golf blades to control their shots. By adjusting the angle of your golf blade and striking it correctly, you can alter the direction of your shot. Putting a downward stroke on a golf blade will send the ball into a downward angle, while putting an upward stroke on the blade will send your shot to an upward angle.

3. The Different Types Of Blades

Golf blades can be categorized into two major groups: woods and irons. There are three types of woods: driving, fairway, and hybrid. Iron types include the long iron (mid irons), short iron (putter), and the blade (wedges). The type of blade that is most appropriate for a specific golfer depends on many factors including their ability level and the course they are playing. Blades can help with balance, the weight you put on your golf club, as well as many other aspects of your game.

4. How To Choose The Right Blade For Your Game?

Golf blades are important tools for playing the game of golf, and there are a variety of blade types to choose from. Be sure to have the correct type of blade before you start your game. Blades come in different types, and some are made for certain situations. The primary differences in blades are the type of metal used to make the blade, the design of the face, and what type of device is used to attach it to the golf club. Blades are consisting of one or more layers of thin sheets of high strength.

5. Why You Should Care About Blades When Playing Golf?

A blade is an important tool for playing the game of golf, and should be cared for to ensure it’s in optimum condition. Blades vary in durability, in order to keep the game fun and engaging. Make sure you take care of your blades as professionals are doing at golf Ryder Cup live stream so that everything runs smoothly. Ryder Cup tournament is one of the biggest part of golf play. It is an annual match play competition between the United States and Europe.

Final Words

Golfers must choose the golf blade that best suits them before they hit the course. Golf blades are available in different types and can be expensive. Durability, weight, and price vary from blade to blade. The heavier blades are better for players with less strength in their swings, while lighter blades will better suit players with stronger swings and who hit closer to the ground.

What is the Best Type of Cabbage for Soup for Weight Loss?

Cabbage soup may be the perfect weight loss recipe for those who want to shed all those extra pounds but still enjoy their food. This home cooked dish is quickly becoming famous in different cultures around the world and it’s easy to see why!

Cabbage soup is a low-calorie and sodium meal that can help you lose weight

Cabbage soup is a low-calorie and sodium meal that can help you lose weight

Cabbage soup contains minimal calories and sodium, so it is an excellent choice for people looking to lose weight. It also has plenty of vitamins, minerals, proteins and fiber, which are great for dieters. The homemade recipe makes it fantastic because you know what ingredients are being used.

You can make cabbage soup in large batches and freeze them for later use, so it’s completely convenient. You can add different ingredients to your casseroles like lentils and try experimenting with different cabbage or methods of cooking.

Cabbage soup is an excellent choice for anyone looking to shed those extra pounds, but still enjoy their food. This home cooked dish will have you running back for more and it’s easy to see why! If you’re trying to lose weight, cabbage soup is the perfect recipe for you. The low calories will allow you to lose those pounds while still feeling satisfied and enjoying your meal!

Cabbage soup may be the perfect weight loss recipe

A new study has been released stating that people who follow a diet that includes cabbage have more weight loss success than other diets. Cabbage soup provides a low-calorie, low-sodium meal that can help you lose weight. You can track your progress by using the old standby of weighing yourself at the same time every day or measuring your waistline with a tape measure monthly. It’s important to remember to stay active daily, drink plenty of water and eat five small meals per day.

The more frequently you consume this weight loss recipe, the fatter you will get! Because it is so tasty that after one meal, you will crave another bowl of delicious cabbage soup made with only the finest all natural ingredients available! For added flavor and enjoyment, simply use real butter instead of margarine! Cabbage soup has been used for ages as a superb source of vitamins, which help restore the body’s natural metabolism. Each portion of cabbage soup contains vitamin A, which is a significant source of overall good health.

What about the best type of cabbage for soup for weight loss?

What about the best type of cabbage for soup for weight loss

The best type of cabbage for soup is green cabbage. Green cabbage has many nutrients that are good for health and maintain your body’s healthy balance. This type of cabbage contains a lot of nutrients, such as vitamin C, which is an antioxidant. This helps fight against cancer and aging. It also increases your metabolism rate so you can burn fat faster and easier. Green cabbages have another health benefit: they help with digestion.

Conclusion

If you’re looking to lose weight, consider adding cabbage into your soup. Cabbage is a low-calorie vegetable that can help fill you up and keep hunger at bay without throwing off the scale. You should also try these other vegetables for weight loss!